【VMware Cloud Director】PostgreSQLについて

構成ファイル

ディレクトリ「/var/vmware/vpostgres/current/pgdata」に構成ファイルは配置されている。

# ls -l /var/vmware/vpostgres/current/pgdata
total 120
-rw------- 1 postgres users     3 Oct 23 08:06 PG_VERSION
drwx------ 7 postgres users  4096 Oct 23 08:07 base
-rw------- 1 postgres users    29 Oct 24 07:10 current_logfiles
drwx------ 2 postgres users  4096 Oct 24 06:49 global
drwx------ 2 postgres users  4096 Oct 24 00:00 log
drwx------ 2 postgres users  4096 Oct 23 08:06 pg_commit_ts
drwx------ 2 postgres users  4096 Oct 23 08:06 pg_dynshmem
-rwxr-xr-x 1 postgres users  4382 Oct 24 07:10 pg_hba.conf
-rw------- 1 postgres users  1636 Oct 23 08:06 pg_ident.conf
drwx------ 4 postgres users  4096 Oct 24 07:10 pg_logical
drwx------ 4 postgres users  4096 Oct 23 08:07 pg_multixact
drwx------ 2 postgres users  4096 Oct 23 08:06 pg_notify
drwx------ 2 postgres users  4096 Oct 23 08:06 pg_replslot
drwx------ 2 postgres users  4096 Oct 23 08:06 pg_serial
drwx------ 2 postgres users  4096 Oct 23 08:06 pg_snapshots
drwx------ 2 postgres users  4096 Oct 23 23:49 pg_stat
drwx------ 2 postgres users  4096 Oct 24 07:10 pg_stat_tmp
drwx------ 2 postgres users  4096 Oct 24 05:50 pg_subtrans
drwx------ 2 postgres users  4096 Oct 23 08:06 pg_tblspc
drwx------ 2 postgres users  4096 Oct 23 08:06 pg_twophase
drwx------ 3 postgres users 12288 Oct 24 07:08 pg_wal
drwx------ 2 postgres users  4096 Oct 23 08:07 pg_xact
-rw------- 1 postgres users   109 Oct 23 23:49 postgresql.auto.conf
-rw------- 1 postgres users   147 Oct 23 08:07 postgresql.auto.old
-rwxr-xr-x 1 postgres users  1492 Oct 24 07:10 postgresql.conf
-rw------- 1 postgres users    82 Oct 23 23:49 postmaster.opts
-rw------- 1 postgres users    93 Oct 23 23:49 postmaster.pid

対象:postgresql.conf, postgresql.auto.conf

設定変更方法

docs.vmware.com

DBアクセス方法

# su - postgres -l
postgres@23-vcd-01 [ ~ ]$ psql -d vcloud
psql.bin (14.5 (VMware Postgres 14.5.0-20449111 release))
Type "help" for help.

vcloud=#
vcloud=#

【VMware Cloud Director】HWバージョンを指定したデプロイ

VCDのGUIからは、VMのHWバージョンを指定したデプロイができない。

しかし、APIを利用することで可能となる。

利用するAPI

POST /vdc/{id}/action/createVm

手順例

1.VCDへアクセス

2.ブラウザの開発ツールを起動

3.VMをデプロイ

4.開発ツールからデプロイのために発行されたAPIを確認

5.デプロイしたVMを削除

6.4にて確認したAPIにおけるHWバージョン箇所のみを変更し、APIにてデプロイ

実行例

curl -k --header "Accept: application/*;version=37.2" --header "Authorization: Bearer xxx" --header "Content-Type: application/*+xml;charset=UTF-8" --request POST https://172.16.23.20/api/vdc/efb8dc82-d242-4607-835b-398aec50b929/action/createVm -d '<root:CreateVmParams xmlns:root="http://www.vmware.com/vcloud/v1.5" xmlns:ns24="http://schemas.dmtf.org/ovf/envelope/1" powerOn="false">
  <root:Description />
  <root:CreateVm name="vm01">
    <root:GuestCustomizationSection>
      <ns24:Info>Specifies Guest OS Customization Settings</ns24:Info>
      <root:ComputerName>vm01</root:ComputerName>
    </root:GuestCustomizationSection>
    <root:NetworkConnectionSection>
      <ns24:Info>Network Configuration for VM</ns24:Info>
      <root:PrimaryNetworkConnectionIndex>0</root:PrimaryNetworkConnectionIndex>
      <root:NetworkConnection network="none">
        <root:NetworkConnectionIndex>0</root:NetworkConnectionIndex>
        <root:IpAddress>any</root:IpAddress>
        <root:IsConnected>true</root:IsConnected>
        <root:IpAddressAllocationMode>NONE</root:IpAddressAllocationMode>
        <root:NetworkAdapterType>VMXNET3</root:NetworkAdapterType>
      </root:NetworkConnection>
    </root:NetworkConnectionSection>
    <root:VmSpecSection Modified="true">
      <ns24:Info>Virtual Machine specification</ns24:Info>
      <root:OsType>centos8_64Guest</root:OsType>
      <root:Firmware>bios</root:Firmware>
      <root:NumCpus>1</root:NumCpus>
      <root:NumCoresPerSocket>1</root:NumCoresPerSocket>
      <root:CpuResourceMhz>
        <root:Configured>0</root:Configured>
      </root:CpuResourceMhz>
      <root:MemoryResourceMb>
        <root:Configured>1024</root:Configured>
      </root:MemoryResourceMb>
      <root:DiskSection>
        <root:DiskSettings>
          <root:SizeMb>16384</root:SizeMb>
          <root:UnitNumber>0</root:UnitNumber>
          <root:BusNumber>0</root:BusNumber>
          <root:AdapterType>5</root:AdapterType>
          <root:ThinProvisioned>true</root:ThinProvisioned>
          <root:overrideVmDefault>false</root:overrideVmDefault>
        </root:DiskSettings>
      </root:DiskSection>
      <root:HardwareVersion>vmx-17</root:HardwareVersion>  ←vmx-19からvmx-17へ変更
      <root:VirtualCpuType>VM64</root:VirtualCpuType>
    </root:VmSpecSection>
    <root:ComputePolicy>
      <root:VmSizingPolicy href="urn:vcloud:vdcComputePolicy:2b8af3fc-a561-4b53-8ed9-227b97621d14" />
    </root:ComputePolicy>
    <root:BootOptions>
      <root:EnterBIOSSetup>false</root:EnterBIOSSetup>
    </root:BootOptions>
    <root:TrustedPlatformModule>
      <root:TpmPresent>false</root:TpmPresent>
    </root:TrustedPlatformModule>
  </root:CreateVm>
</root:CreateVmParams>'

7.HWバージョン17にて作成されていることを確認

※HWバージョンをアップグレードする場合

最新バージョンへアップグレードされる

POST /vApp/{id}/action/upgradeHardwareVersion

【VMware Cloud Director】APIによるvApp操作(新規作成、VMコピーなど)

テンプレートからvApp作成

POST /vdc/{id}/action/instantiateVAppTemplate

VMware Cloud Director API - POST-InstantiateVAppTemplate

例:vApp名を指名するのみで、構成をそのまま作成する場合

 curl -k --header "Content-Type: application/vnd.vmware.vcloud.instantiateVAppTemplateParams+xml;charset=UTF-8" --header "Accept: application/*;version=37.0" --header "Authorization: Bearer xxx" --request POST https://172.16.23.20/api/vdc/efb8dc82-d242-4607-835b-398aec50b929/action/instantiateVAppTemplate -d '<root:InstantiateVAppTemplateParams xmlns:root="http://www.vmware.com/vcloud/v1.5" name="vApp10" xmlns:ns11="http://schemas.dmtf.org/ovf/envelope/1" xmlns:ns12="http://schemas.dmtf.org/wbem/wscim/1/cim-schema/2/CIM_ResourceAllocationSettingData" xmlns:ns13="http://www.vmware.com/schema/ovf">
   <root:Source href="https://172.16.23.20/api/vAppTemplate/vappTemplate-53ab1483-189b-4738-b2bc-9c2e96f4c4ed"/>
 </root:InstantiateVAppTemplateParams>'

※データ部

<root:InstantiateVAppTemplateParams xmlns:root="http://www.vmware.com/vcloud/v1.5" name="vApp10" xmlns:ns11="http://schemas.dmtf.org/ovf/envelope/1" xmlns:ns12="http://schemas.dmtf.org/wbem/wscim/1/cim-schema/2/CIM_ResourceAllocationSettingData" xmlns:ns13="http://www.vmware.com/schema/ovf"> ←nameにて作成するvApp名を指定
   <root:Source href="https://172.16.23.20/api/vAppTemplate/vappTemplate-53ab1483-189b-4738-b2bc-9c2e96f4c4ed"/> ←コピー元のテンプレートを指定
 </root:InstantiateVAppTemplateParams>

vApp内でVM複製

POST /vApp/{id}/action/recomposeVApp

VMware Cloud Director API - POST-RecomposeVApp

curl -k --header "Content-Type: vnd.vmware.vcloud.recomposeVAppParams+xml" --header "Accept: application/*;version=37.0" --header "Authorization: Bearer xxx" --request POST https://172.16.23.20/api/vApp/vapp-7ea18240-58af-4b57-88e3-32aae13a230b/action/recomposeVApp -d '<?xml version="1.0" encoding="UTF-8" standalone="yes"?>
<RecomposeVAppParams xmlns="http://www.vmware.com/vcloud/v1.5"
 xmlns:ns2="http://schemas.dmtf.org/ovf/envelope/1"
 xmlns:xsi="http://www.w3.org/2001/XMLSchema-instance"
 xmlns:ovf="http://schemas.dmtf.org/ovf/envelope/1"
 xmlns:environment_1="http://schemas.dmtf.org/ovf/environment/1">
  <SourcedItem sourceDelete="false">
    <Source href="https://172.16.23.20/api/vApp/vm-ade1a033-ea15-4dee-bac8-ee28eac34336"/>
    <VmGeneralParams>
       <Name>vm02</Name>
    </VmGeneralParams>
  </SourcedItem>
</RecomposeVAppParams>'

※データ部

<?xml version="1.0" encoding="UTF-8" standalone="yes"?>
<RecomposeVAppParams xmlns="http://www.vmware.com/vcloud/v1.5"
 xmlns:ns2="http://schemas.dmtf.org/ovf/envelope/1"
 xmlns:xsi="http://www.w3.org/2001/XMLSchema-instance"
 xmlns:ovf="http://schemas.dmtf.org/ovf/envelope/1"
 xmlns:environment_1="http://schemas.dmtf.org/ovf/environment/1">
  <SourcedItem sourceDelete="false">
    <Source href="https://172.16.23.20/api/vApp/vm-ade1a033-ea15-4dee-bac8-ee28eac34336"/> ←コピー元のVMを指定
    <VmGeneralParams>
       <Name>vm02</Name> ←作成VM名を指定
    </VmGeneralParams>
  </SourcedItem>
</RecomposeVAppParams>

vApp 電源操作

・パワーオン

POST /vApp/{id}/action/deploy

https://developer.vmware.com/apis/1260/doc/operations/POST-DeployVApp.html

・パワーオフ

POST /vApp/{id}/action/undeploy

https://developer.vmware.com/apis/1260/doc/operations/POST-UndeployVApp.html

【VMware Cloud Director】vCPU 速度やメモリリソースの確保などについて

vCPU 速度やメモリリソースの確保などは、組織VDCのデフォルト指定やVMサイジングポリシーにて指定ができる。

組織VDCによる設定

以下のようにプロバイダーにおける組織VDCから設定可能

VM作成時の設定

上記の設定にてVMを作成すると、以下のように設定される。

VM1: CPU 1コア、Mem 1GB

メモリリソースの確保

1GB(1024MB) * 20% = 204MBが設定される

vCPU 速度

1コア * 1GHz = 1GHzが設定される

vcloud=# select name,vcpu_speed_mhz from vapp_vm;
 name | vcpu_speed_mhz
------+----------------
 vm01 |           1000

デフォルト設定変更時の挙動

vCPUスピードを1GHzから2GHzへ変更

新規にVM1と同様のVMを作成

VM2: CPU 1コア、Mem 1GB

vCPU 速度

vcloud=# select name,vcpu_speed_mhz from vapp_vm;
 name | vcpu_speed_mhz
------+----------------
 vm02 |           2000
 vm01 |           1000

デフォルト設定が反映された各VMの設定は、デフォルト設定を変更しても影響を受けないことが確認できる

新規に作成されるVMにのみ影響がある

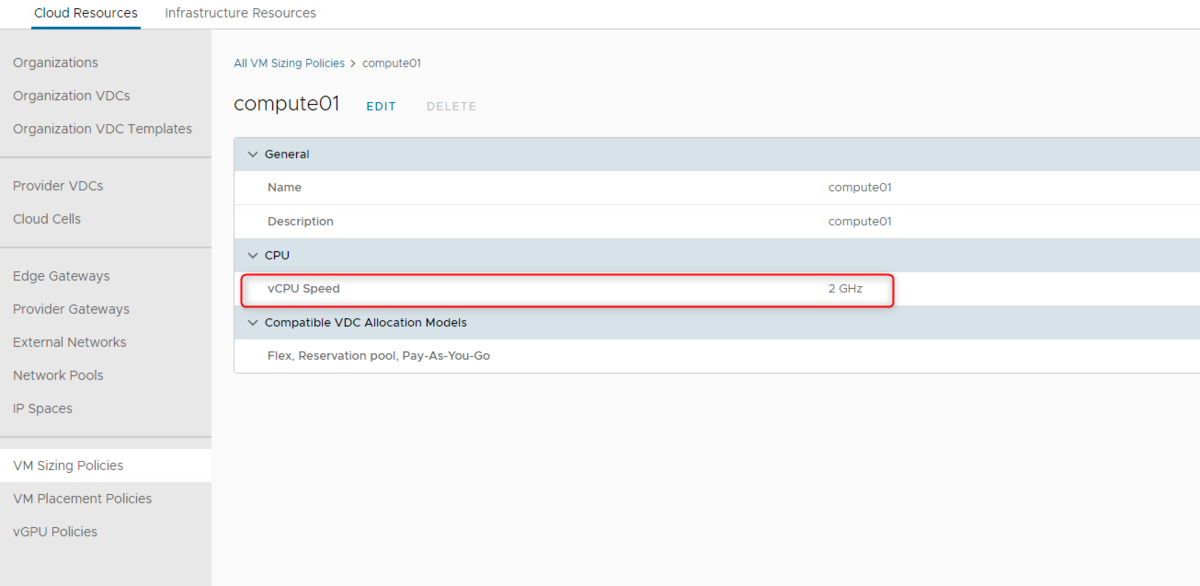
vCPUサイジングポリシーを変更する方法

1.vCPUスピードが2GHzであるサイジングポリシーを作成

2.組織VDCにサイジングポリシーを追加

3.VM1にサイジングポリシーを付与

4.変更の確認

vcloud=# select name,vcpu_speed_mhz from vapp_vm;
 name | vcpu_speed_mhz
------+----------------
 vm02 |           2000
 vm01 |           2000

【VMware Cloud Director Availability】VCD内のvApp移行

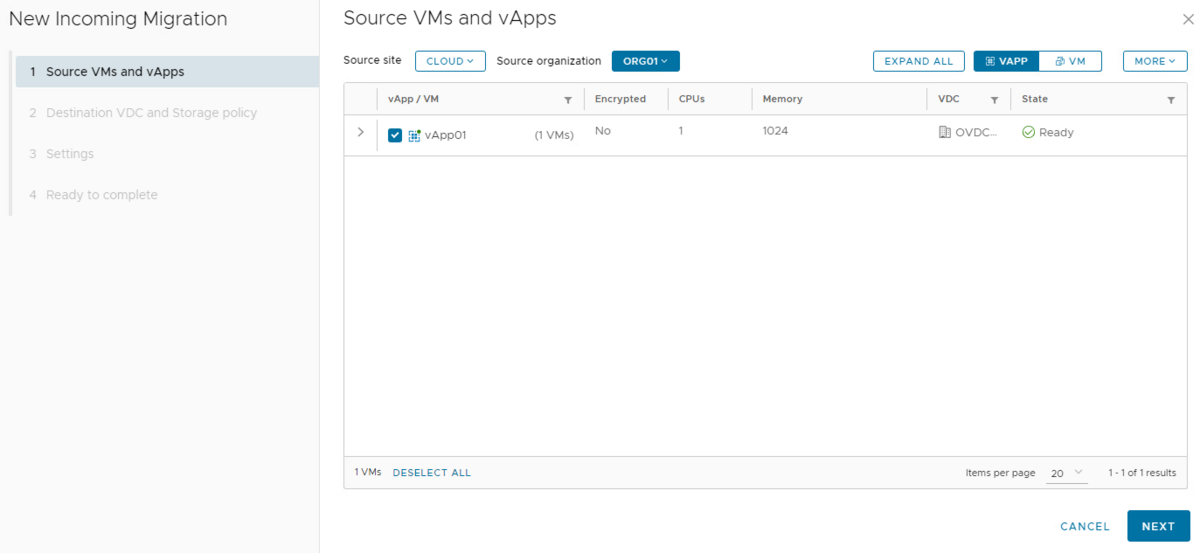
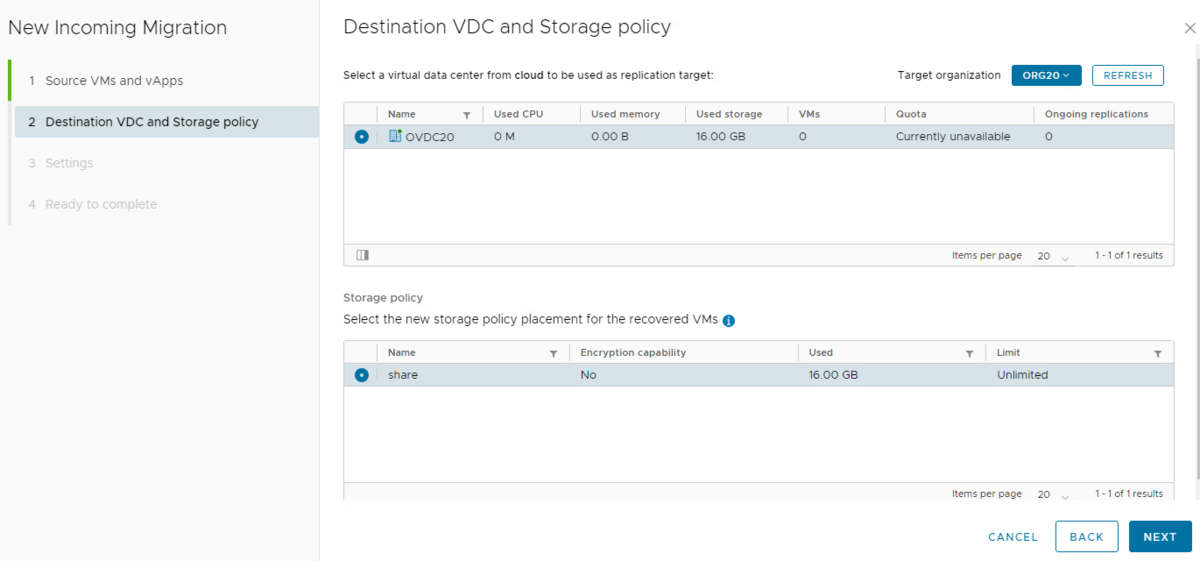
VCDAを利用しない場合、vAppは同一組織内の組織VDC間のみ移動できる。

VCDAを利用すると、組織間の移行が可能となる。

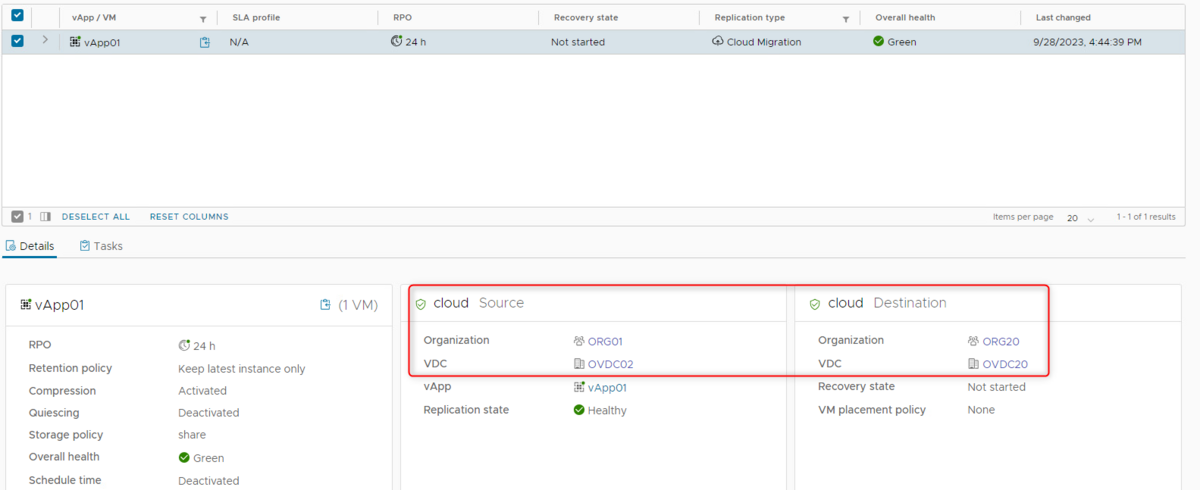
例:組織①(ORG01)から組織②(ORG20)への移行

組織間の移行を実施するために必要な構成が、テナントユーザーとプロバイダーユーザーでは異なる。

プロバイダーユーザーの場合、VCDに対して1つのVCDAをデプロイするのみでよい。

しかしテナントユーザーの場合、VCDに対して1つのVCDAをデプロイするのみだと、同一組織内での移行しかできない。

テナントユーザーでも組織間の移行を実現するためには、VCDに対して2つのVCDAをデプロイし、ペアリングする必要がある。

【ESXi】vsish

vsish(VMkernel Sys Info Shell)ユーティリティはESXiに含まれており、以下のように情報の取得や変更が可能。

・利用方法

[root@esxi:~] vsish
/>

vsishと入力するだけで、ユーティリティが起動される

・利用できるコマンド

/> help
        cd       - change working directory
        ls       - list nodes
        dir      - list nodes
        pwd      - print working directory
        get      - perform GET operation
        cat      - synonym for GET
        set      - perform SET operation
        typeget  - get type information
        typels   - list type-level nodes
        loglevel         - set debugging log level
        exit     - quit shell
        quit     - quit shell
        q        - quit shell
        help     - print help
/>

・設定値の取得方法

/> get /config/Misc/strOpts/HostName
Vmkernel Config Option [string] {
   Default value:localhost
   valid characters:**
   Current value:esxi.env.lab
   hidden config option:1
   Description:Host name
   Host specific config option:0
   Option update requires reboot:0
   Option update requires maintenance mode:0
}
/>

設定値一覧:Hidden VSISH Configurations Only - Generated on Mon Aug 23 21:53:13 PDT 2010

・設定変更方法

/> set /config/Misc/strOpts/HostName testHost.env.lab
testHost.env.lab
/>
/> get /config/Misc/strOpts/HostName
Vmkernel Config Option [string] {
   Default value:localhost
   valid characters:**
   Current value:testHost.env.lab
   hidden config option:1
   Description:Host name
   Host specific config option:0
   Option update requires reboot:0
   Option update requires maintenance mode:0
}
/>

ワンライナーでの実行

[root@testHost:/tmp] vsish -e get /config/Misc/strOpts/HostName
Vmkernel Config Option [string] {
   Default value:localhost
   valid characters:**
   Current value:testHost.env.lab
   hidden config option:1
   Description:Host name
   Host specific config option:0
   Option update requires reboot:0
   Option update requires maintenance mode:0
}

※参考

What is VMware vsish?

【ESXi】configstore

7.0 U2 以降では、サービス構成は特殊な構成保存データベースに保存されます。

データベースの設定にアクセスするには、 /bin/configstorecli ツールを使用します。

・Config Storeによって管理されているファイルのリストを表示

[root@esxi:~] configstorecli files get
{
   "cached": [
      "/etc/slp.reg",
      "/etc/vmware/schemastore/schema-store-1",
      "/var/lib/sfcb/registration/repository/root/interop/cim_indicationfilter",
      "/var/lib/sfcb/registration/repository/root/interop/cim_indicationfilter.idx",
      "/var/lib/sfcb/registration/repository/root/interop/cim_indicationhandlercimxml",
      "/var/lib/sfcb/registration/repository/root/interop/cim_indicationhandlercimxml.idx",
      "/var/lib/sfcb/registration/repository/root/interop/cim_indicationsubscription",
      "/var/lib/sfcb/registration/repository/root/interop/cim_indicationsubscription.idx",
      "/var/lib/sfcb/registration/repository/root/interop/cim_listenerdestinationcimxml",
      "/var/lib/sfcb/registration/repository/root/interop/cim_listenerdestinationcimxml.idx",
      "/var/lib/sfcb/registration/repository/sfcb-0-0/root/interop/qualifiers",
      "/var/lib/sfcb/registration/repository/sfcb-0-0/root/interop/qualifiers.idx"
   ],
   "config": [
      "/etc/dhclient-vmk0.conf",
      "/etc/dhclient6-vmk0.conf",
      "/etc/host.conf",
      "/etc/issue",
      "/etc/motd",
      "/etc/nscd.conf",
      "/etc/ntp.keys",

・各構成値にアクセスするための、スキーマ情報取得

[root@esxi:~] configstorecli schema list
{
   "esx": { ← Component
      "assignhw": [ ← Group
         "overrides" ←Key
      ],
      "attestation": [
         "tpm2_settings",
         "tpm2_endorsement_keys",
         "tpm2_ca_certificates",
         "esx_base_images",
         "certificate"
      ],
      "authentication": [
         "user_accounts",
         "trust_security_token_issuers",
         "esx_token_config",

スキーマは3層構成になっており、それぞれComponent / Group / Keyをと呼ばれ、それらを指定することで各構成値を指定する。

・構成値を取得

[root@esxi:~] configstorecli  config default get  -c esx -g services -k vpxa
{
   "alarm": {
      "check_frequency": 20,
      "power_on_silence": 60
   },
   "core": {
      "debug_options": {
         "disconnect_hostd": false,
         "ignore_snapshot_config_cache": false,
         "simulate_invalid_snapshot_mo": true,
         "simulate_invalid_snapshot_mo_once": false
      },
      "host_sync": {
         "get_changes": {
            "asyncvmxblob": true,
            "delay": 0,
            "envbrowser_refresh_rate": 300,
            "timeout": 0
         },
         "guestdisk_use_percentage_diff_check": false,
         "heartbeat": {
            "interval": 10,
            "stress_delayed_heartbeat": 300,
            "stress_duration": 180000000,
            "stress_enabled": false,
            "stress_missed_heartbeat": 500
         },
         "host_health_system_throttle_interval": 0,
         "max_event_reporting_delay_seconds": 60,

コマンドにおける、defaultはそのほかにもcurrentとdesireがある。

また、getの代わりにset / update を利用すると設定ができるが、その際はcurrentを指定する必要がある。

・設定変更時の挙動確認

①configstorecliにて直接変更する場合

1.設定値を記載したjsonファイルを作成

[root@esxi:/tmp] cat /tmp/wel.json
{
   "message": "test"
}

2.設定をアップデート

[root@esxi:/tmp] configstorecli  config current update -c esx -g system -k welcome_message -infile /tmp/wel.json
Update: completed successfully.

3.変更を確認

[root@esxi:/tmp] configstorecli  config current get  -c esx -g system -k welcome_message
{
   "message": "test"
}

②esxcliにて変更する場合

1.現在値を確認

[root@esxi:~] configstorecli  config default get  -c esx -g system -k welcome_message
{
   "message": ""
}
[root@esxi:~]
[root@esxi:~] configstorecli  config current get  -c esx -g system -k welcome_message
{}
[root@esxi:~]
[root@esxi:~] esxcli system welcomemsg get
[root@esxi:~]

2.設定をアップデート

[root@esxi:~] esxcli system welcomemsg set -m="welcome"
[root@esxi:~]

3.変更を確認

[root@esxi:~] esxcli system welcomemsg get
welcome
[root@esxi:~]
[root@esxi:~]
[root@esxi:~] configstorecli  config current get  -c esx -g system -k welcome_message
{
   "message": "welcome"
}
[root@esxi:~]

esxcliにてconfig storeが変更されていることが確認できる。

※参考

https://kb.vmware.com/s/article/82227?lang=ja

https://kb.vmware.com/s/article/2046347

Introduction to the new ESXi Configuration Store CLI (configstorecli)